Size Isn’t Random — It’s Based on Placement
One of the biggest mistakes we see is customers guessing at patch size. They’ll say, “I want a patch on the chest” and leave it at that. Six weeks later, the sample arrives and it’s either swimming on the garment or so small you can barely read the design.
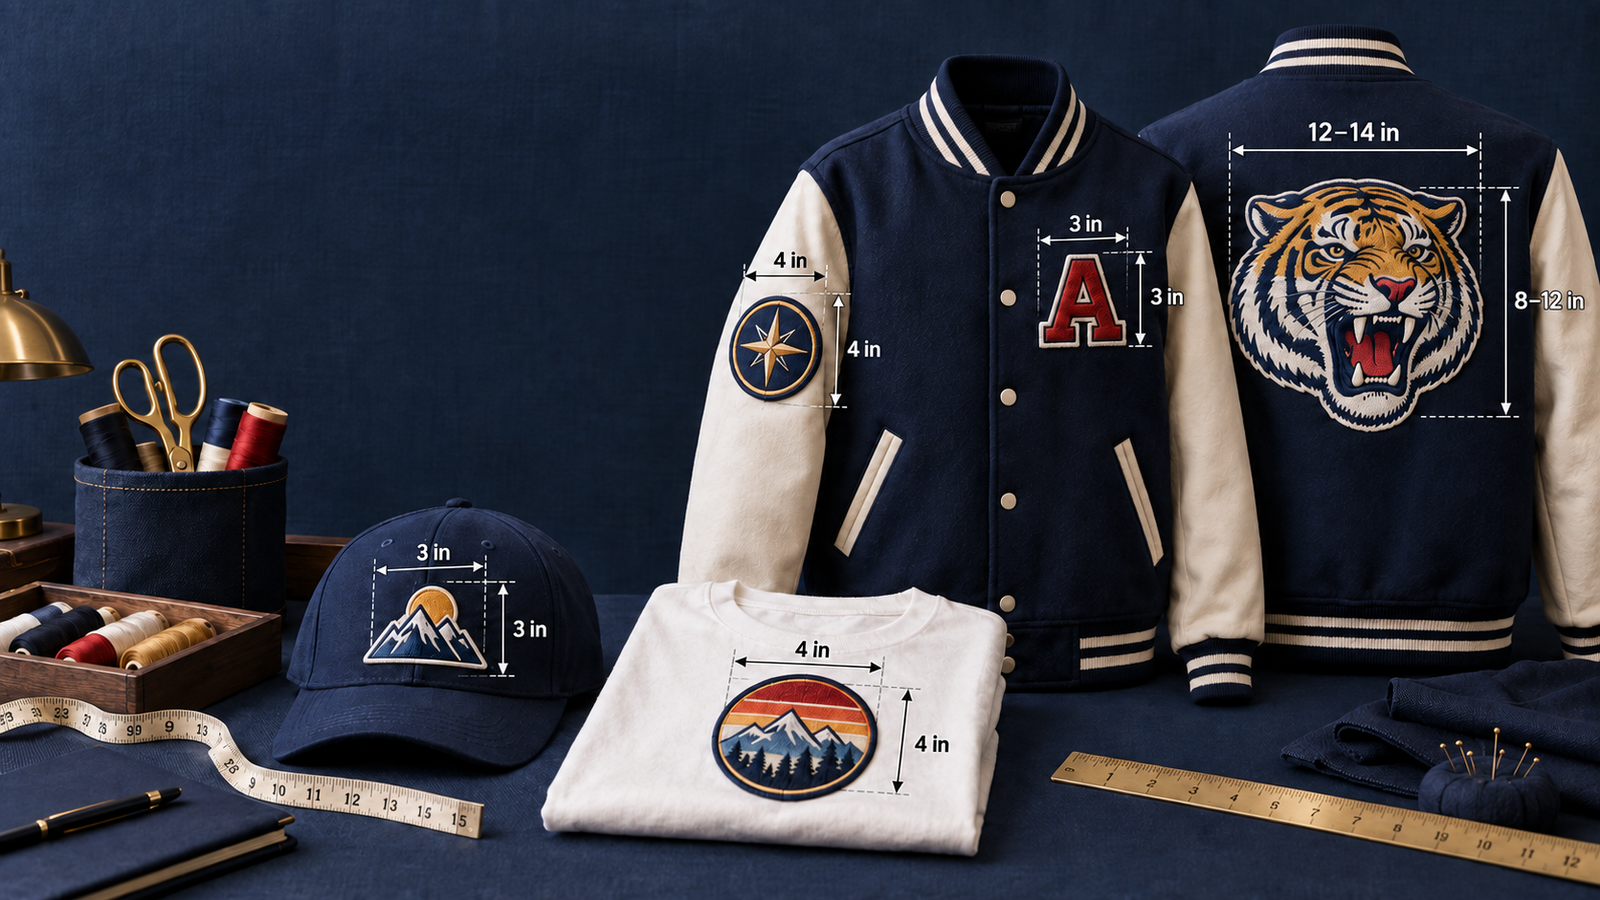
Size should be decided by two things: where the patch is going, and how far away someone needs to be to read it clearly. A back patch can be 12–16 inches and still look proportional. A hat crown can’t be more than 3–3.5 inches, or it dominates the entire hat.
Here’s the standard sizing for every common placement, tested across thousands of orders and real-world wear.
Left Chest / Heart Side
The classic placement. A left chest patch is visible when someone faces you directly, and it’s the most “personal” spot on a garment — it’s closest to the heart and reads as a badge of honor or affiliation.
Standard size: 2–4.5 inches (varies by garment type and design complexity)
- Polo shirts / dress shirts: 2–3 inches. Small enough to fit between the pocket and the shoulder seam without overwhelming the garment.
- T-shirts: 2.5–3.5 inches. Larger shirts can handle the bigger end; fitted shirts need the smaller sizes to stay proportional.
- Hoodies / sweatshirts: 3–4 inches. More fabric real estate, so you have room to go larger.
- Jackets / blazers: 3–4.5 inches. Formal wear can handle the largest left-chest patches because the jacket itself is substantial.
The key: the patch should sit about 2–3 inches below the shoulder seam and be centered on the left side. If your design is very wide (landscape orientation), keep it toward the 2-inch height to maintain proportion. If it’s square or tall (portrait), 3–4 inches works well.
Right Shoulder / Sleeve
Military units, police departments, fire departments, scouts, and athletic teams often place patches on the right shoulder. This placement reads well from the front and fits naturally into the garment’s structure.
Standard size: 3–4 inches (height, measured as the biggest dimension)
Right-shoulder patches sit on the shoulder cap itself, not on the upper arm. They’re highly visible and photograph well from the front. This is the placement for badges, rank, unit identity, and affiliation.
Full Back / Center Back
Back patches are the boldest statement. They’re seen from behind and at a distance, so they can be much larger without looking cramped. Back patches are popular for teams, large group uniforms, fraternity/sorority wear, and brands that want a statement piece.
Standard size: 12–16 inches (or larger for oversized designs)
A full-back patch should sit centered, starting about 2–3 inches below the collar and extending down toward the mid-back. On an adult jacket or hoodie, 12–16 inches reads perfectly proportional. On a child’s garment, 6–10 inches is more appropriate.
Front Center / Chest + Abdomen
Some designs call for a larger front-facing patch that spans from chest to mid-belly. This is less common than left chest or back, but it’s increasingly popular in streetwear and brands building strong visual identity.
Standard size: 12–14 inches (height)
Front-center patches work best on oversized hoodies, vintage-style tees, and jackets. They command attention but can overwhelm smaller garments or fitted silhouettes.
Upper Sleeve / Arm
Upper-sleeve patches (bicep area) are popular in athletic and military wear. They’re visible from the front and side, and they don’t interfere with the torso or front of the garment.
Standard size: 3.5–4.5 inches (height)
The patch should sit on the upper arm, roughly 1–2 inches below the shoulder seam. On a fitted sleeve, keep it toward 3.5 inches. On a looser athletic sleeve, you can go to 4.5 inches.
Forearm / Lower Sleeve
Forearm patches are less common but striking when used. They’re visible in photos and add visual interest to an outfit without competing with chest or back placement.
Standard size: 3–4 inches (height)
This placement works on jackets and loose sleeves. On fitted sleeves, it can look cramped.
Hat Crown / Cap Top
Patches on hat crowns are a classic look, especially in streetwear, sports, and outdoor brands. But there’s a hard constraint here: the crown is small, so your patch size is limited.
Standard size: 3–3.5 inches MAX
Anything larger than 3.5 inches and the patch dominates the entire hat. The patch should sit centered on the crown, with even spacing on all sides. Curved designs work better than square ones on curved hat surfaces.
Hat Visor / Bill
Visor patches are less common but memorable. They’re seen from the front when the wearer looks down, and they add a subtle detail.
Standard size: 3–4 inches (width)
The patch should sit centered on the visor, with enough margin on both sides that it doesn’t wrap awkwardly around the curved edge.
The Proportion Problem (And How to Avoid It)
Here’s the biggest mistake: customers specify two different dimensions when they should specify one.
Wrong way: “I want a 4×6 inch patch.”
Right way: “I want a patch with its biggest dimension being 4 inches.”
Why? Because if your design is square and you stretch it to 4×6, it becomes a rectangle. Your logo stretches. Lettering gets squeezed. What looked balanced now looks warped.
The fix: Always specify the biggest dimension only. If your design is 3 inches wide and 2 inches tall, just say “3-inch patch.” Let the proportions stay true. The height will automatically become 2 inches.
If you absolutely need two dimensions (for a rectangular design that’s intentionally landscape), the digital mock-up we provide will show you exactly how it looks. You’ll see the proportion before production, so there’s no surprise.
Garment Type Matters Too
The same size patch looks different on a fitted t-shirt versus an oversized hoodie versus a jacket. Here’s a quick reference:
Fitted garments (slim fit tees, athletic wear): Stick to the smaller end of the sizing range (2–3 inches for chest, 6–8 inches for back).
Standard fit (regular hoodies, crews, jackets): Middle of the range works (3–4 inches chest, 10–14 inches back).
Oversized garments (vintage oversized tees, baggy hoodies): Go larger (4–5 inches chest, 14–16+ inches back).
When in Doubt, Ask. We’ll Show You.
Still not sure if your patch size is right for your placement? You don’t have to guess. Tell us your placement and garment type, and we’ll recommend a size. Better yet, order your custom patch, and we’ll create a free digital mock-up showing exactly how it looks on the garment at that size. You approve the mock-up before we stitch a single thread.
Related Reading
- AI-Generated Patch Designs vs. Real Embroidery — See what actually changes when your design becomes a patch
- Embroidered vs. PVC vs. Chenille Patches: Real Durability Data — Choose the right material for your placement
- Custom Patch Design: DIY vs. Professional — Design guidance for sizing and placement-specific layouts
- How Streetwear Brands Stand Out With Patches — Strategic placement for maximum visual impact