More and More Customers Are Coming to Us With a Design Already Made
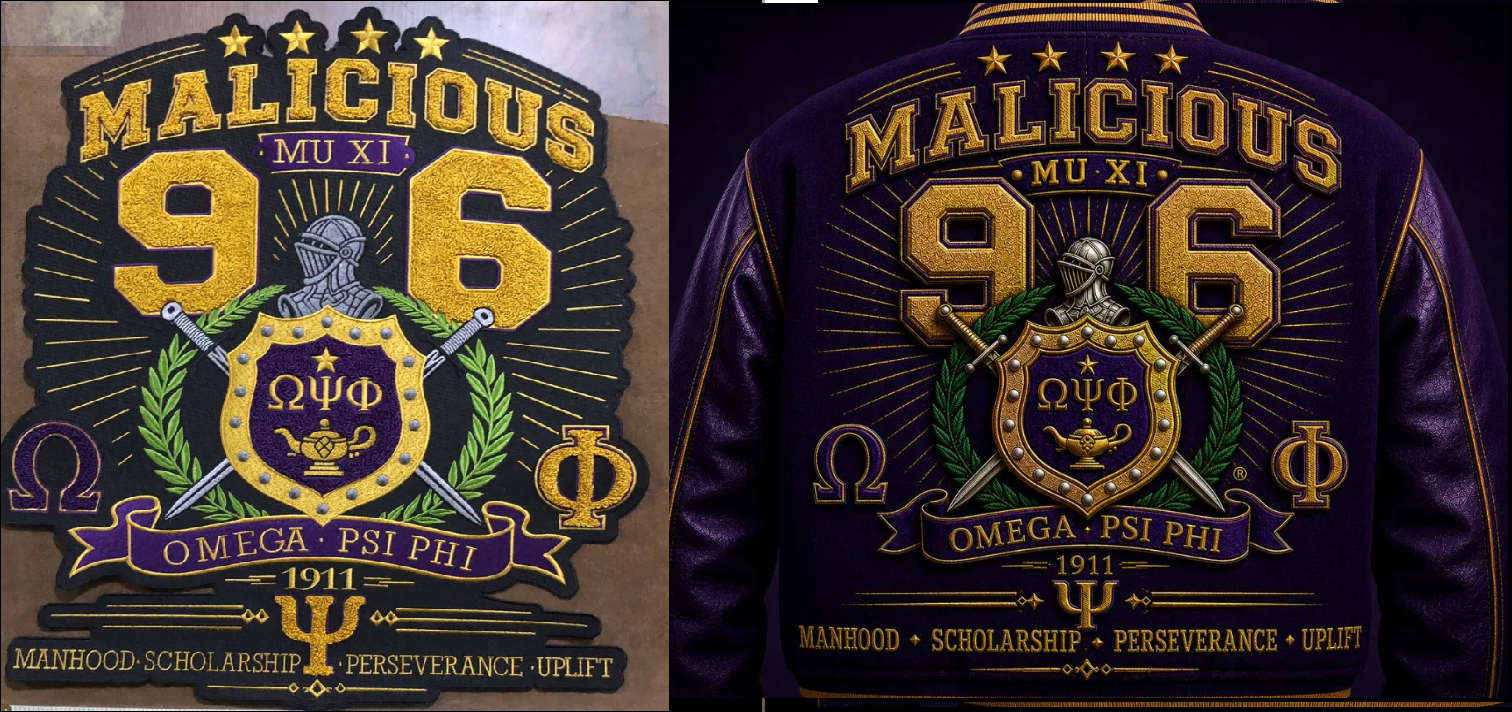
The trend is undeniable: customers walk in the door with a patch design they created using AI. They used DALL-E, Midjourney, Leonardo, or another image generator to create what they thought was a perfect patch design. It looks sharp on their screen. The colors pop. The detail is intricate. They hand it over and ask: “Can you stitch this?”
The short answer: yes, we can. But what you’re about to get might look different from what you see on your screen. And that’s not a failure. It’s the reality of translating a photorealistic digital image into thread.
Why AI Designs Don’t Always Translate Directly
AI image generators are built to produce photorealistic detail — soft gradients, subtle shadows, complex textures. An AI engine will create a patch design with hundreds of color gradations, fine line work, and details so small you’d need a magnifying glass to see them clearly.
Embroidery has hard constraints. Embroidery machines stitch thread onto fabric. Each stitch is a physical object. You can’t create a gradient the way Photoshop does — you can approximate it by using multiple thread colors and blending them, but it takes space. Fine lines thicker than a human hair are impossible. Tiny details that look perfect at 300% zoom disappear when the patch is actual size on a jacket.
The size of your patch is what determines how much of this actually matters. A 10-inch patch can hold incredible detail. A 2-inch patch cannot.
What Happens When You Bring an AI Design
Here’s our actual process: when a customer brings an AI-generated design, we don’t just send it to the embroidery machine. We digitize it. That means a real person — usually with 10+ years of embroidery experience — redoes your design specifically for embroidery production.
The digitizer looks at what you’ve created and asks:
- How big is this patch going to be? A 12-inch back patch and a 3-inch sleeve patch need completely different approaches to line weight, detail density, and color choices.
- Which colors can we realistically achieve with thread? Your AI design might have 47 color variations. Embroidery thread comes in specific colors. We match as close as possible, but sometimes we need to simplify or suggest an alternative that threads actually produce.
- Which details are physically possible to stitch at this size? If your design has hair-thin lines at 2 inches, those lines will disappear or look clunky. The digitizer simplifies, thickens, or removes them entirely.
- What’s the stitch direction and density that will make this look best? This is where the craft comes in. A professional digitizer doesn’t just trace your design — they make directional choices about how thread will flow, which details get emphasized, and how to create depth and dimension with stitching direction.
We’re not trying to talk you out of your AI design — we’re translating it into something that will look incredible as an actual stitched patch on an actual garment.
Case Study 1: Omega Psi Phi Fraternity Varsity Patch — 21 Inches
The AI Design
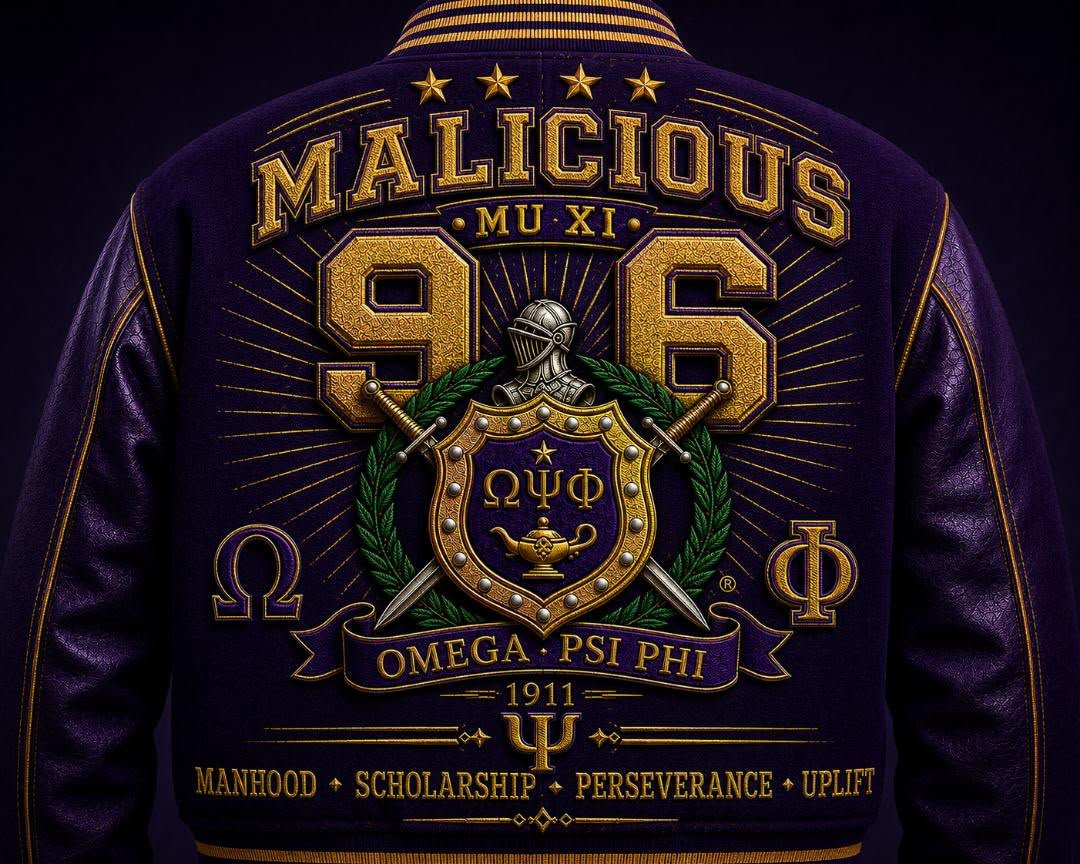
A customer came to us with an AI-generated design for a large back patch. It was the Omega Psi Phi shield with intricate internal details, gradients in the background, and thin decorative lines around the border. The design was 21 inches — massive, intended for a varsity jacket back panel.
What Changed During Digitization
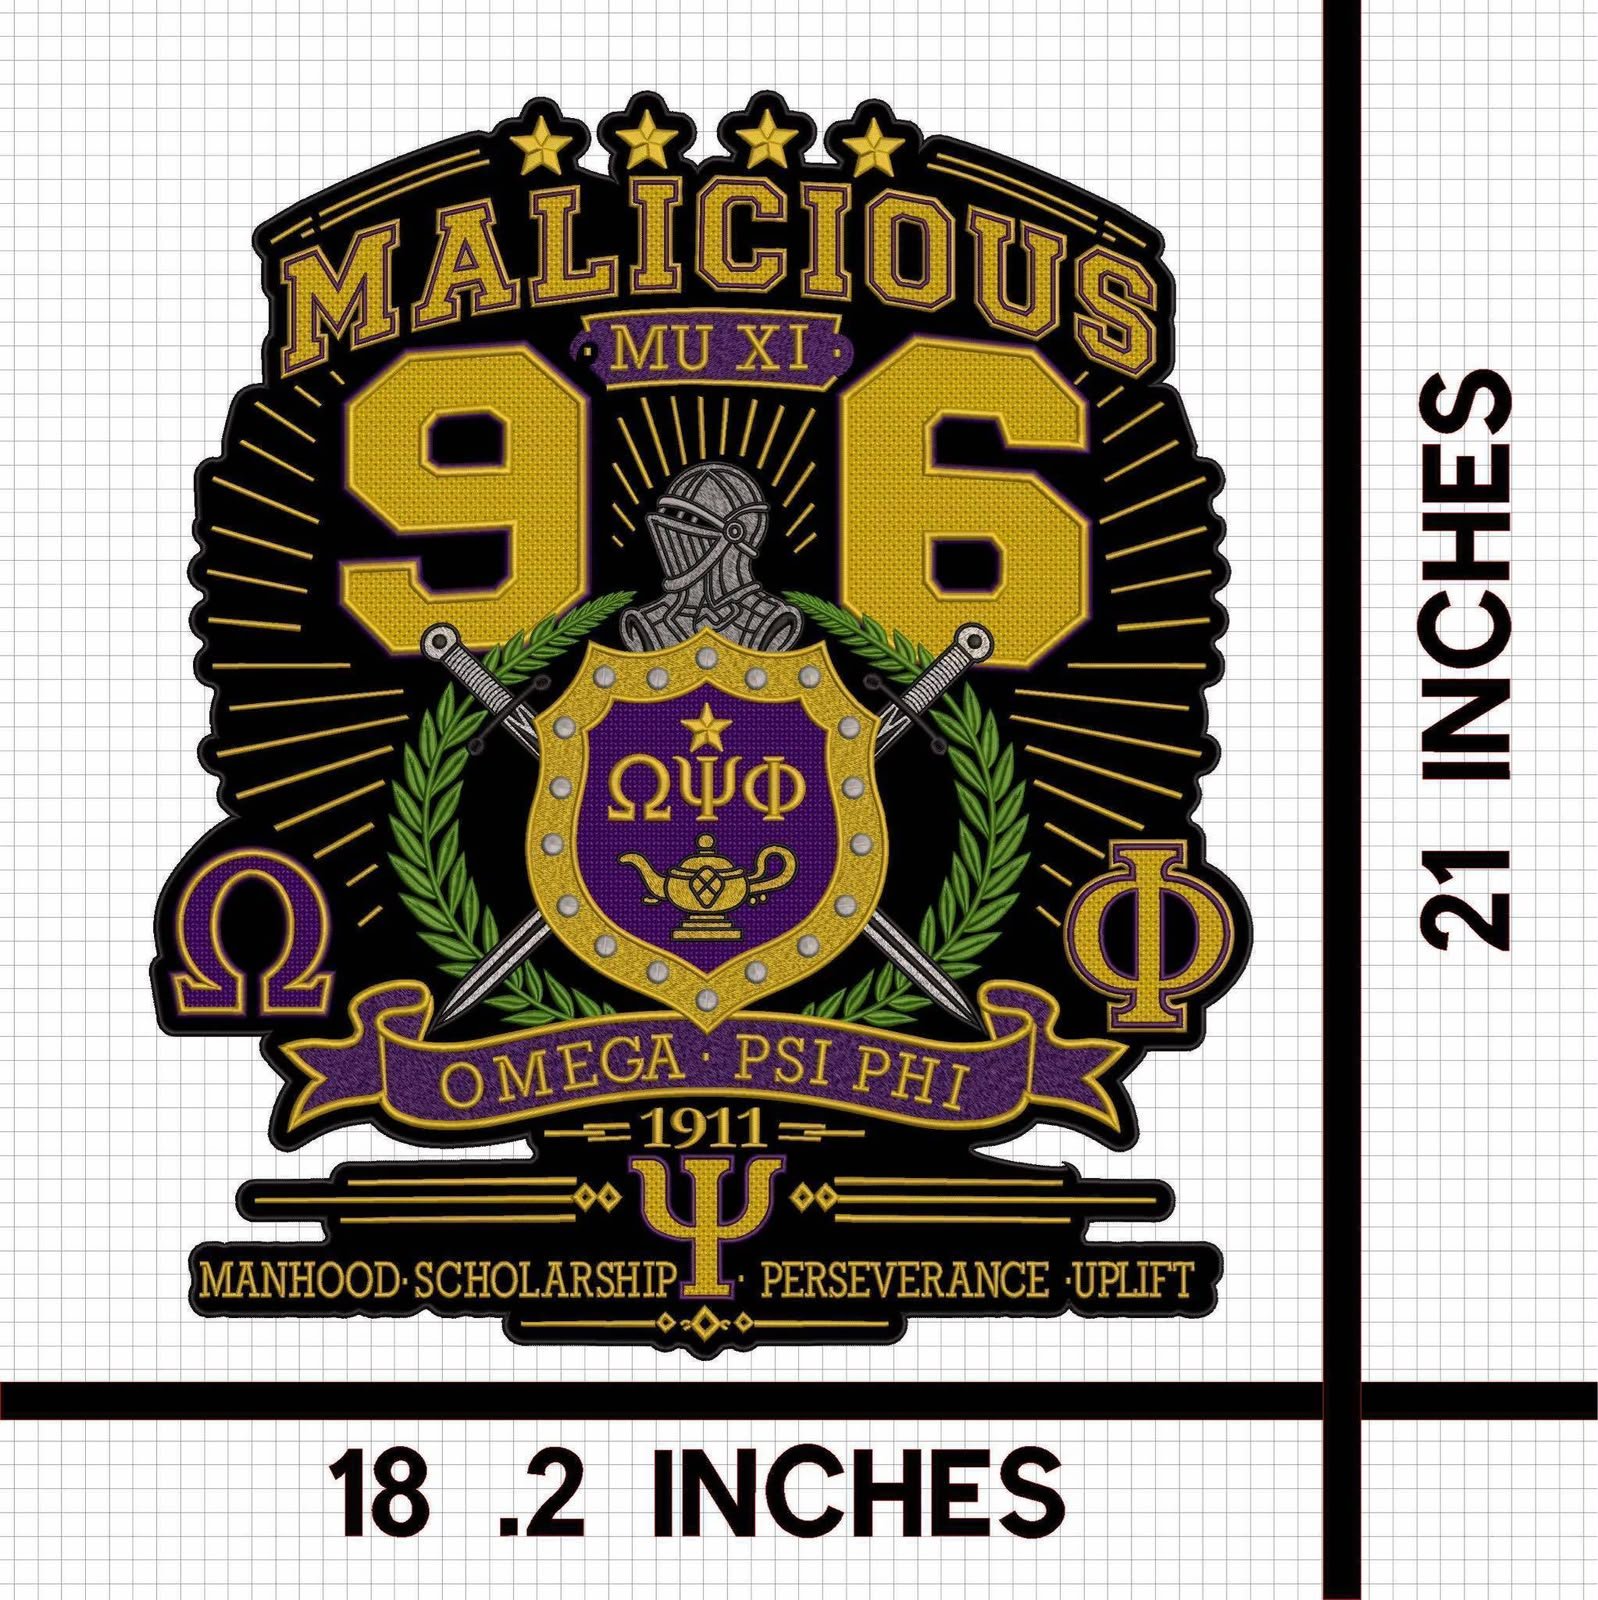
At 21 inches, most of the AI design could be preserved. But the digitizer made key choices:
- The thin decorative border lines were thickened from 0.5pt to 2pt, so they’d be visible and durable.
- The gradient background was simplified into 3 thread colors instead of 47, creating the illusion of gradient through stitch direction and density.
- Small internal details within the shield were enlarged slightly so they wouldn’t disappear during wear and washing.
- Thread colors were adjusted to thread-available colors (not all Pantone values exist in embroidery thread).
The Digital Mockup
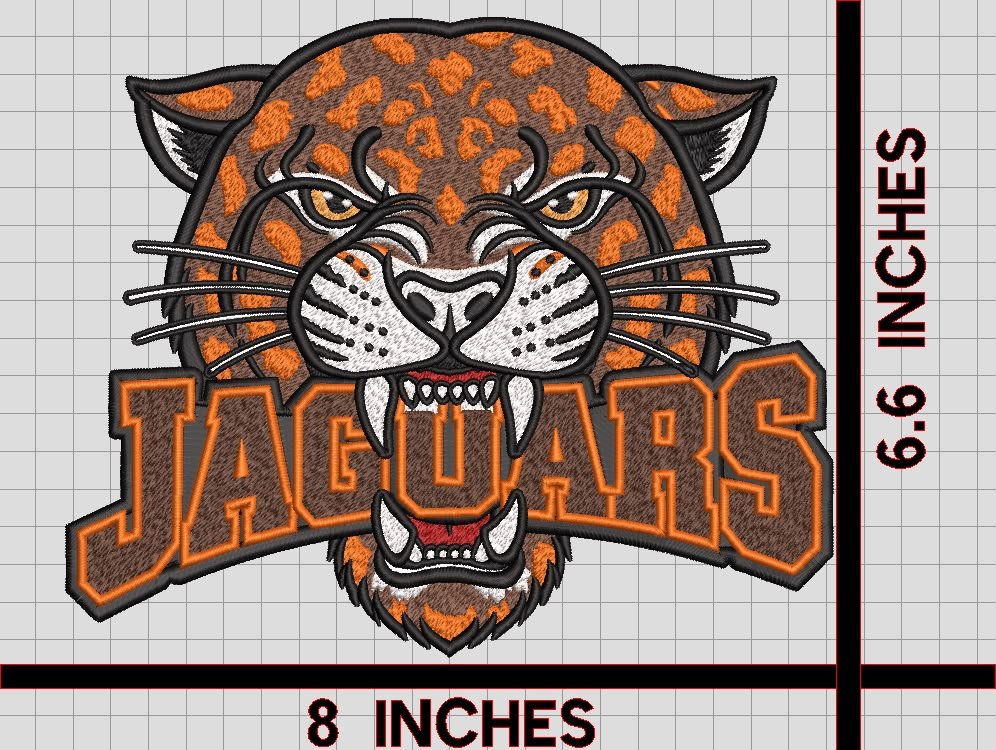
We created a digital mockup showing exactly how the patch would look at that size on a varsity jacket. The customer approved the changes, and we moved to physical sampling.
The Finished Patch
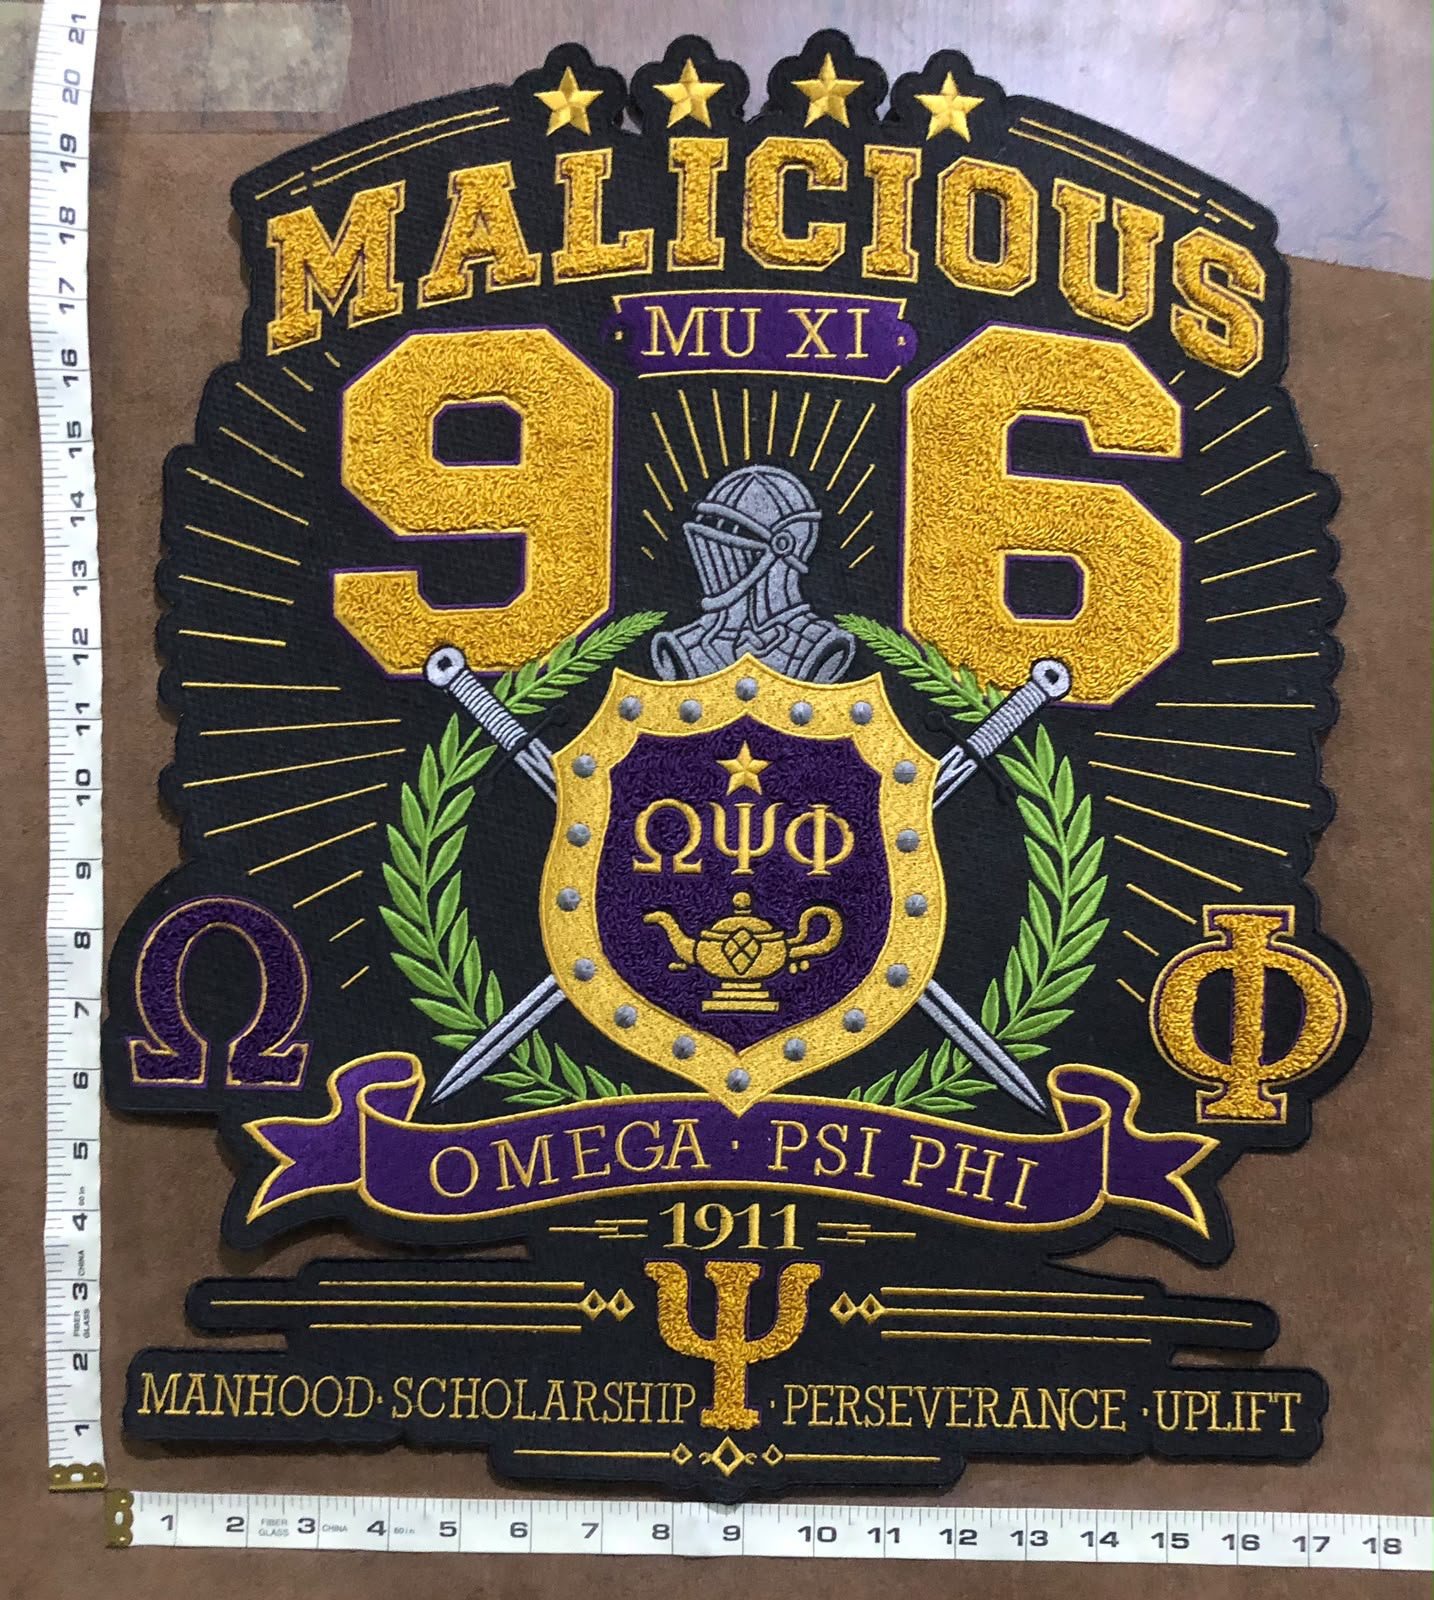
The final stitched patch was a 21-inch embroidered back panel with incredible detail, dimensional stitching, and colors that matched the original intent. The customer was thrilled. What looked “close but different” in the digital mockup looked perfect when sewn and worn.
Case Study 2: Custom Jaguar Mascot Patch — 8 Inches
The AI Design
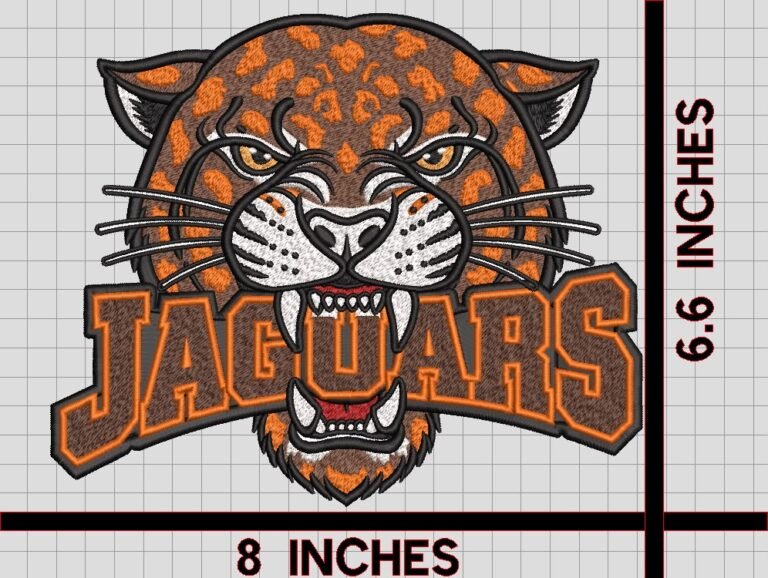
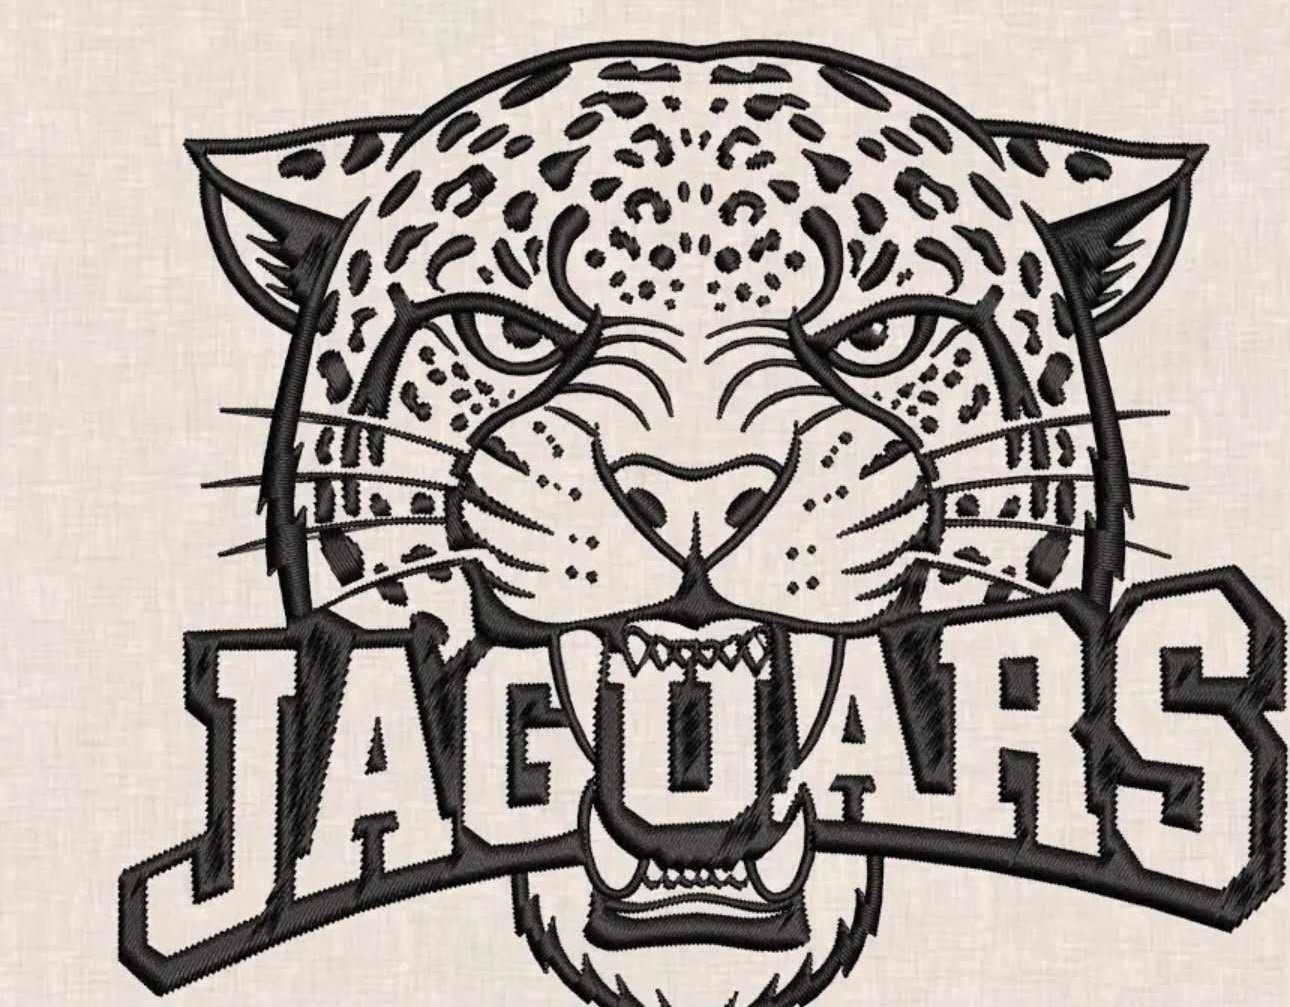
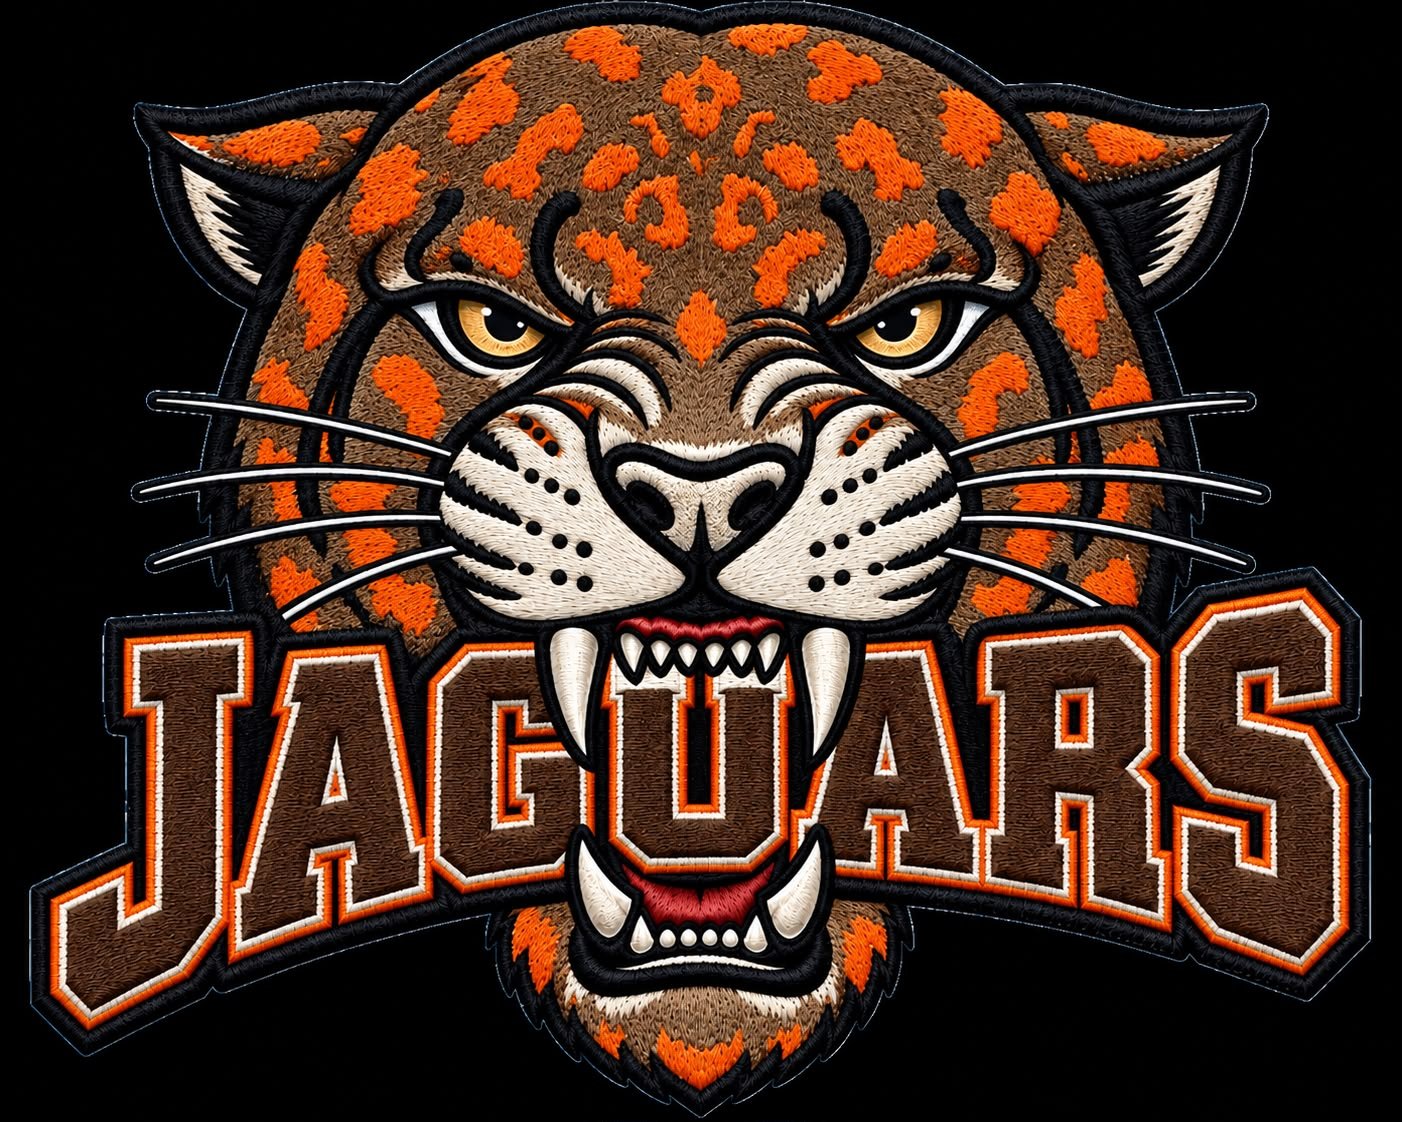
A school district created an AI design of a jaguar head for a sports team patch. The design was photorealistic — detailed fur texture, complex shading in the face, realistic eye detail. It looked incredible on screen.
Why the Digitizer Had to Make Major Changes
At 8 inches, this patch size requires significant simplification. Photorealistic detail doesn’t work at small-to-medium scale because:
- Embroidery thread is thicker than any brush stroke. You can’t create photorealistic texture by stitching — you can only suggest it.
- The realistic eye detail that looks perfect in the AI image becomes a muddy brown blob at 8 inches if you try to stitch every gradation.
- The fur texture in the original design would require thousands of stitches and still wouldn’t look photorealistic.
The Solution
The digitizer simplified the jaguar into a stylized version that captured the essence of the AI design but worked as embroidery:
- The photorealistic fur became bold directional stitching that suggested texture without attempting photorealism.
- The complex eye shading became a bold, clean eye that actually looked better than the photorealistic version at small scale.
- Color palette was reduced from 12+ colors to 5 thread colors that worked at scale.
- The overall style became “stylized mascot” instead of “photorealistic jaguar” — and that actually made it more effective as a sports patch.
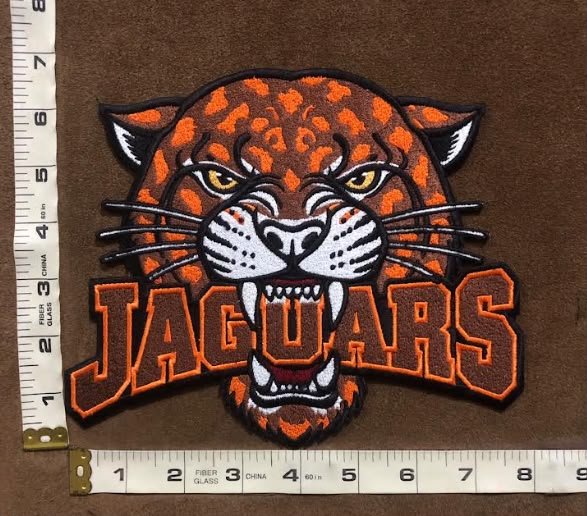
The Finished Patch
The finished 8-inch embroidered patch was bold, readable, and distinctly “this school’s jaguar” — better than the photorealistic original would have been at that size. The school loved it.
The Mockup Is Your Safeguard
This is why we always create a free digital mockup before production. The mockup shows you exactly how the patch will look at full stitch-out scale. You see the detail level, the color choices, the simplifications we made — and you approve it before a single thread gets stitched.
If the mockup doesn’t match your expectations, we adjust. If you want more detail, we find a way to add it (or suggest a larger patch size). If something reads wrong, we fix it. The mockup is your chance to say “this doesn’t work” with no cost and no waste.
AI Designs Still Work — You Just Need to Understand the Translation
AI-generated designs are a fantastic starting point. You get to visualize your idea, test concepts, and refine direction before investing in professional design work. The truth is: most AI designs translate beautifully into patches. They just need a professional digitizer who understands embroidery constraints and knows how to make smart choices about simplification, scale, and color.
If you’re starting with an AI design, here’s what you should do:
- Tell us your patch size and placement (chest, back, sleeve, etc.).
- Share your AI-generated design file.
- Let us create a free digital mockup showing how it’ll look as an actual embroidered patch.
- Approve the mockup, and we stitch a physical sample with photos before bulk production.
You’ll see exactly what your patch will look like before you commit to a single production run. And that removes all the guesswork.
Related Reading
- Embroidered Patch Placement & Sizing Guide — Sizing standards by garment placement and how to avoid the proportion mistake that ruins everything
- Embroidered vs. PVC vs. Chenille Patches: Real Durability Data — Know which materials hold up best and what to expect after 40+ wash cycles
- Custom Patch Design: DIY vs. Professional — When to hire a designer and when AI can handle the job
- How Streetwear Brands Stand Out With Patches — Why custom patches command premium pricing and build brand loyalty